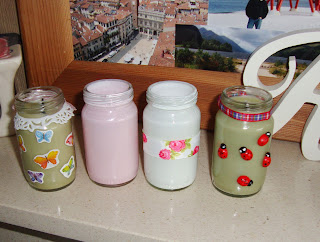
So here I go with my first Craft A Day, The Bronny Way! I didn't have a clue what to start with so hope you all enjoy it and the escapade with the food colouring.
I have a tendency to collect and hoard crafty things with the thought that I am bound to use it one day! Well I collected small glass jars with the intention of filling them with pretty bright buttons. I never got round to filling them so I have made use of some of them today. I give you..... the Glass Jar Beeswax Candles!
They smell absolutely Divine as beeswax has a natural sweet aroma. They will also make the perfect little gift if you want to try your hand at handmade!
For this project you will need:
- Glass jars (I used the small ones you get from chicken spread) and their lids
- Beeswax or any other candle way you would like to use (you could even use boring plain tea lights))
- Candle Wick (I get mine on eBay)
- A sterilised tin can (to melt the wax)
- Something to keep the wick in place - I use a kebab skewer snapped in half and then tape the end.
- Things to decorate your candles with including ribbon, glue and paint.
The first thing to do is make sure that all of your jars are clean and glue free. It took me ages to get the glue off as I didn't have a scourer so if you have one of those it will make your job ten times easier. I used the back of a dinner knife to scrape it all off after a soak in hot water.
While the jars are drying, put the beeswax (or other wax) into the sterilised tin. Pour a glass of water into the saucepan (or more if needed) and place the tin of wax into the water. This is to melt the wax without letting any water in. It's just like melting chocolate! Leave to simmer and melt.
 Next you need to prepare the wick. I cheated and used the wick from a candle making set and twisted it onto a bigger piece of wick but you can buy longer wicks with a metal flat end. Dip the end of the metal plate in the melting wax just to cover the bottom. Straight away, place this in the middle of your jar and secure the 2 sticks/snapped skewer in place. I just rest mine on top like the picture on the left. Make sure it sticks in place.
 |
| Has a green hue on my camera |
When the wax has fully melted, pour slowly into the jar being careful not to spill any or get any on the rim of the jar. You don't want a messy candle ha ha. Fill it just below the screw on lid bit like the photo on the right. Leave to cool and set. Sometimes a small hole will form on the top, just smooth this over with your finger and it will look perfect!
I decided that it would be amazing to turn the wax a different colour to make different coloured candles. What ever you do, DO NOT use food colouring like I did!! I put some in to the melting wax and it curdled and spat and made very strange spluttering noises!! A bit like a mild volcano! Trying to get the disaster averted, I knocked over another candle that was cooling and went on the floor! That was fun trying to get off the tiles! So take my advice and steer clear of the food colouring! I realise now that it was because it was wax mixed with water which doesn't mix at all......
Now comes the fun bit!!! Decorating your candle! I just grabbed the first things I saw to decorate mine and I couldn't find the hot glue gun (as its buried in my massive craft stash.... oops) so the items aren't on as secure as I would have liked. So use your imagination and make them pretty!! I used stickers, little wooden ladybirds, ribbon, butterflies and lace to do mine. Get creative!
 |
| Pop the lids on to keep them yummy! |
I also painted the outside of 2 other jars (the pink and white ones in the photos) and I will just put tea lights in these. However I didn't really think about it and the tea lights don't fit!!! So make sure they fit in the jar before you paint something. Leave to dry and then with a candle inside, it will shine a lovely warm colour. Match it to the decor in your living room or bedroom.
Why not bend an old coat hanger or some craft wire and twist it round the screw on bit and make a little handle to hang in your garden? Use your imagination and go wild! I would love to see yours when you are finished! I hope you have enjoyed reading this...... go on..... go and have a go!!


