To start this post off I must apologise. I know I said I would do a craft a day but stuff came up and I couldn't get onto the computer. So I will make it up with showing you how to make your own personalised buttons with left over fabric or material of choice!
I love making these as each button is different. Each one comes out slightly different and they can be as cute or as loud as you want! I want to do embroidery on them next even though I have never tried this. Sounds like fun. Anyway.... enough of me waffling!
To make your own buttons you will need:
Self cover buttons with backs (I have tried both the metal ones and plastic ones but find the metal ones best)
Scrap material or anything you want to make buttons from.
Scissors
Button Making Tool (but you could use a heavy hand but may be harder)
You can get the Button Maker tool I have from eBay by clicking HERE
The Self cover buttons are also on eBay with the same person HERE so you get a postage discount.
First step is to cut a piece of material bigger than the button so that it can tuck inside. I do it about 1.5cm bigger than the button size. Some people cut it into a circle but I do it the quick way haha! I have never been one for patience! Place it over the button maker tool in the right size hole for the button (mine is 22mm).
Next place the button on top of the material and push down so it keeps the material tight. This can be done without the button maker by wrapping it over the button nice and tight.
Trim off the material that goes over the edges so it will have a neater finish. This is where material lovers will cringe at the thought of losing that little bit of fabric! If you had cut it in a circular shape, you would not need to trim. Now tuck in the material into the little shark like teeth so it grabs the material. It will then look something like this.
Now get the back of the button and place it down so that the dents face in. This will then clip into the button and secure it in place.
Place the button maker tool on top of the button and press down hard until you hear a click. If you don't have a tool then push really hard but it may take a bit of effort. Take it out of the button maker and there you have your cute little fabric buttons!
Add them to an outfit, a bag, or make hair clips out of them! You can put them on anything!
Tuesday, 8 May 2012
Sunday, 6 May 2012
Day 11 - Lets Go Fly A Kite
I watched Mary Poppins yesterday and couldn't resist trying to make my own kite!! The one we made flew beautifully but died as it hit a tree. (Note to self - do not fly a kite close to trees). I didn't take any photos as my camera's battery decided to fail so I have pinched a couple of images of home made kites from google similar to the one we made.
I will show you how we made ours but you can design it however you like. This keeps the kids entertained and they can learn a bit of science when something they made is flying high and they've sent it soaring, up to the atmosphere, up where the air is clear, oh lets goooooooooooooo, fly a kite......... Sorry couldn't resist!
To make your own kite, you will need:
102cm Square Sheet of Brown Paper (I used parcel paper)
2 x 6mm Wooden Dowels (90cm long and 102cm long)
Ruler
Pencil
Scissors
String
Craft Knife/Stanley Knife
Pritt Stick/PVA
Wood Glue
50cm Nylon Cord
Paint, Ribbons and things to decorate
To start with, make a cross with the 2 sticks, with the shorter stick placed horizontally across the longer stick. Make sure both sides of the cross piece are equal in width.
Tie the two sticks together with the string in such a way to make sure that they are both at right angles to each other. Dab a bit of wood glue to stick it in place.
Cut a notch (with the help of a trusty adult) with the craft knife at each end of both sticks. Make it deep enough for the string. Cut a piece of string long enough to stretch around the kite frame. Wrap it around and knot it off at the final notch.
Cut two 15cm pieces of cord and knot each one into a loop. Tie one at the top of the kite and one at the bottom. Flatten out the brown paper and place the kite frame on top. Draw straight lines using a ruler around it, leaving a 3cm margin. Cut around carefully and fold the edges over gluing them in place nice and tight.
Cut a piece of string about 120cm long and tie one end to the loop at the top of the kite, and the other to the loop at the bottom. Tie another small loop in the string just above the intersection of the cross pieces where the flying line will go.
Make a tail for the kite by cutting off about a meter of cord and tying on small pieces of ribbon at regular intervals at about 10cm apart. Attach this tail to the bottom of the kite. The kite should be as light as possible so don't attach to much ribbon.
Decorate the kite with paint or pencils. We did a union jack!
Tie the free end of the rest of the nylon cord onto the centre loop. Keep the cord on its roll as this is the flying line and reel. Now go and fly your kite!
Friday, 4 May 2012
Day 10 - The Avengers Assemble A Mask and a Box!
Evening everyone! I went to see the Avengers yesterday in IMAX 3D and it was truly amazing! It was my first IMAX film and I loved how clear and in your face it was! After watching the yummy manly heroes, I was inspired to make something comic book hero related. So I have made a mask and a little box!
I'll start off with the mask as you can wear this as you make the box to make you feel like a superhero! I couldn't decide on which hero to be so I chose all of them and picked the entire Marvel crew!
To make the mask you will need:
Card
Pen/Pencil
Scissors
Glue/Pritt Stick/Double Sided Tape
Elastic/String/Ribbon
Hole Punch
Pictures to cut out (I got mine from google and they are copyrighted by Marvel so do not make this to re sell, only for personal use)
First of all, either design your own mask shape on card or you can use the template I used by clicking HERE. Make sure it will fit the shape of your face. I went around it in black pen to make it clearer to cut out. When you are happy with your shape, cut it out and use the hole punch to cut out small circles where the elastic/string will go through.
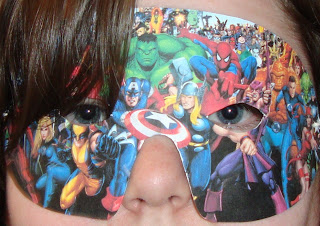
Next, design your mask how you want. Paint it, colour it or do what I did and print off a picture and stick it on top of the mask like the picture to the right.
Cut out the eyes carefully making sure they match up to where your own eyes are. I re hole punched the circles as I papered over them and I had something that looked like this on the left.
Attach some elastic or string so that it will fit over the persons head and tie a knot on either side like the photo to the right. Now turn it over and admire your work of art! Pop it on and hey presto.... you are a super hero with your own disguise!
Now to make the box! You can keep your super hero secrets in here or lock your powers away in here! You need all the same things as before plus a box to decorate. I got mine from Hobbycraft but I am sure you can get them anywhere or just use a different type of box. It can be any size but mine is a small one.
The first thing I did was print off some pictures from google of the Avengers and cut them out. I started with the lid.
Cover the lid with PVA glue and then put your pictures on top. When they are all in place, do not cover in PVA. Save this til the end when everything on the box is in place and when it dries first. Otherwise it will go bobbly as it is too damp.
Cover the entire box in this way with the design of your choice and when it is dry, cover with a layer of PVA glue and leave to dry. When it dries it will become clear and hard. Mine isn't quite dry yet but this is the best photo I can show you. I will update my blog tomorrow with the finished box.
And there you have it, Avenger inspired super hero items!! Have fun and get messy! That's all part of the fun! Now I am off to save the world............
Thursday, 3 May 2012
Day 9 - Frog Origami
I am posting early today as I am out for the day! I am watching the new Avengers film in IMAX 3D so I will be making something tomorrow comic book related! Until then, I thought I would show you all how to make an origami frog that bounces. It gives you lots of fun and you can design them how you like. So before I ribbit on too much, lets get cracking.......
The only thing you need for this is a piece of A5 Card. It will still work with paper but wont be as long lasting. I used green card and just a marker pen to colour in the eyes.
The first thing to do is to lay out your piece of card in a landscape position. Following the diagrams, fold and unfold corner A diagonally to corner D. Then fold corner B to corner C. This will form a cross which takes up two thirds of the rectangle.
Next, fold and unfold the card along the line E and F as shown. This will line up with corners C and D.
Push down where the 3 folds meet. This will make the folds lift slightly from the surface.
Push points E and F inwards and with the other hand, fold the top (A/B) across to points C and D.
Your card should end up looking like this. Fold up corners A and B as shown here. This will form the front feet of the frog.
Fold in the edges at points C and D. The two edges will meet in the middle.
Make a Z Shaped pleat (a gentle crease rather than a hard fold) by creasing halfway along the frogs body, and then again a quarter of the way along its body.
Flip the card over and there you have your frog! To make him jump, press down on its back edge, then slide your finger off really quickly so the frog flicks up into the air.
You can make them in alsorts of colours and decorate how you wish. Just remember though, the more decorations the heavier the frog becomes so the lower it will jump. Let me know how you get on!
Wednesday, 2 May 2012
Day 8 - Decoupage Money Jar
I loved making this!! It was so fun to do and loved getting a little bit messy. This is a glass jar I had in the house covered with themed papers to turn into a money jar. Decoupage is the art of decorating an object by gluing paper cut outs into a design.
You need to allow time for drying when doing this and also make sure you take a look at what not to do as well as what to do as I learnt from my mistakes.
What you will need:
PVA Glue or Découpage glue
Decoupage papers or posh tissues (I found mine in The Works and are 2 for £1.50 at the moment)
Paintbrush
Scissors
Ribbon or things to decorate with
The first step to recreate this is to make sure your glass and lid is clean. Pour out some PVA glue. and prepare your paper. I cut them up into pieces the size of large stamps like the photo to the right as its easier to smooth down. I also left some of them looking like notes but these didn't mould over the curve of the glass very well so I wouldn't recommend this.
Next, cover a patch of your jar in PVA glue in the area you are going to work on and stick the paper/tissue onto the jar like the photo to the right. Place it any way you want. There is no wrong or right way at all. PVA over it with your paint brush to secure it into place. When it dries, it will be clear and will also make it hard similar to Paper Mache.
Do this the whole way around the jar until it is completely covered like the photo to the left. Leave to dry. DO NOT leave on a radiator or use a hair dyer as the paper will crack or the glue will form little air bubbles. I left mine outside as it has been a lovely day today.
When it has dried you are free to use it as your money jar! I have left mine as it is but you can do the same thing with the lid, decorate it with a ribbon or even cut a hole in the lid for a money slot! I would love to see yours!! Go on.... have a go!!
Day 7 - Pencil Pot-tin'
First of all, sorry I didn't update my blog yesterday. I ended up going to a friends and staying there all day and most of the night. So a hangover and a few coffees later, here I am ready to give you a fresh idea to do.
I made two things today, one is this lovely pencil pot and the other will be on the next post.
I seem to have loads of tins knocking around so rather than throwing them out, I thought I would try and make use of them! Being the crafty arty person that I am, I also have lots of pens and pencils and nowhere to keep them all. So this is the perfect solution.
This is the quickest guide on how to do it as it really is simple.
File down the sharp edges of the tin so it wont cut you when you go in to get your pens. I just used a metal file and it worked wonders!
All you have to do is put double sided tape from the top to the bottom about 6 times around the tin. This is so the wool will have something to stick to as you wind it around.
Get your ball of wool and start at the top and go round and round keeping it nice and tight until you get to the bottom. When you get to the bottom, tuck the wool in or tape it underneath so it cant be seen.
Add a bit of detail like a bow or a pom pom like me and there you have it..... a Pencil Pot Tin!! Why not make it multicoloured or give it a theme. It could be a British pencil pot, a butterfly one or anything better that you can imagine.
Subscribe to:
Posts (Atom)